 |
| Finished Quilt was photographed out in the back yard!
This has been a good season in my creative life. I usually don't have time to make quilts just for the heck of it. My quilts usually have to leave home, in a Fed Ex box, on their way to a show, a client, or magazine. NOT THIS TIME!
My cousin Mary is more like a fourth sister. She and I couldn't have grown up in more diverse settings--she lived in San Diego, played at the beach, lived in what all of us non-Californians considered Heaven on Earth. After all, Cheryl Tiegs was often shown on a Southern California beach--or Malibu. All the cool people, like the Beach Boys, sang all about "California Girls", and Paul Revere and the Raiders were from Southern California!
On the other hand, I lived on a ranch in the middle of the San Luis Valley, near Antonito, Colorado. The nearest beach was the Great Sand Dunes, north of Alamosa--and there was a little creek there. No ocean. We did have some amazing swimming pools, though. "Splashland" was near Alamosa, and up in Hooper was another amazing pool (open even in the dead of winter). The water in both pools are as warm as a bathtub, and the water came bursting out of Mother Earth, hot enough that it had to be cooled before you could swim in it! But Cheryl Tiegs hadn't been to either one.
So, now, fifty years later, Mary and I both live in Southern Utah. We both love painting, and have taken classes at Dixie State University--together! She has never owned a quilt that I made. I set about remedying that, a couple of years ago. I started making the top, and finished it quickly. To inspire me, I had some wonderful pieces of fabric from a nature line from Marcus Fabrics. I received a little collection of Moda 2 1/2" squares in one of their nature lines, and the two were married in what became the quilt top.

Actually, I even mixed a square of fabric from Jenifer Sampou's collection. It's all about the colors and textures.
So, the quilt top waited, and waited.....and waited. Suddenly, just after Christmas, a few weeks ago, I decided that Mary needed to have her quilt for her birthday. That only gave me a few days to finish, so my daughter donated some Moda fabric for the back, and I assembled the quilt, and began the process of quilting. This one was really custom quilted. I began with some pale green Aurifil thread, making some grasses at the bottom of the quilt, then used some gray thread to make pebbles, moved upward and added some pale aqua thread for the scalloped water, and ended with some off-white clam shells for clouds in the sky.

Pale gray thread finished the outside border in concentric rows of straight stitching, to frame the quilt. The backing was the color of the water--a subdued turquoise with some wonderful little designs interspersed throughout. Some pale green grass-design fabric became the binding (hand stitched to the back of the quilt), and it was done! I missed Mary's birthday. It was yesterday. Today, the quilt was finished, photographed, and delivered to Mary. She loved it. Said she had always wanted to ask me to make a quilt, but had somehow hesitated. When you know someone that well, you respond to the request, even if it isn't uttered.
|
Saturday, January 7, 2017
Mary's "Sand and Water and Air" Quilt!
Monday, November 7, 2016
Adventures at Quilt Market
Quilt Market 2016

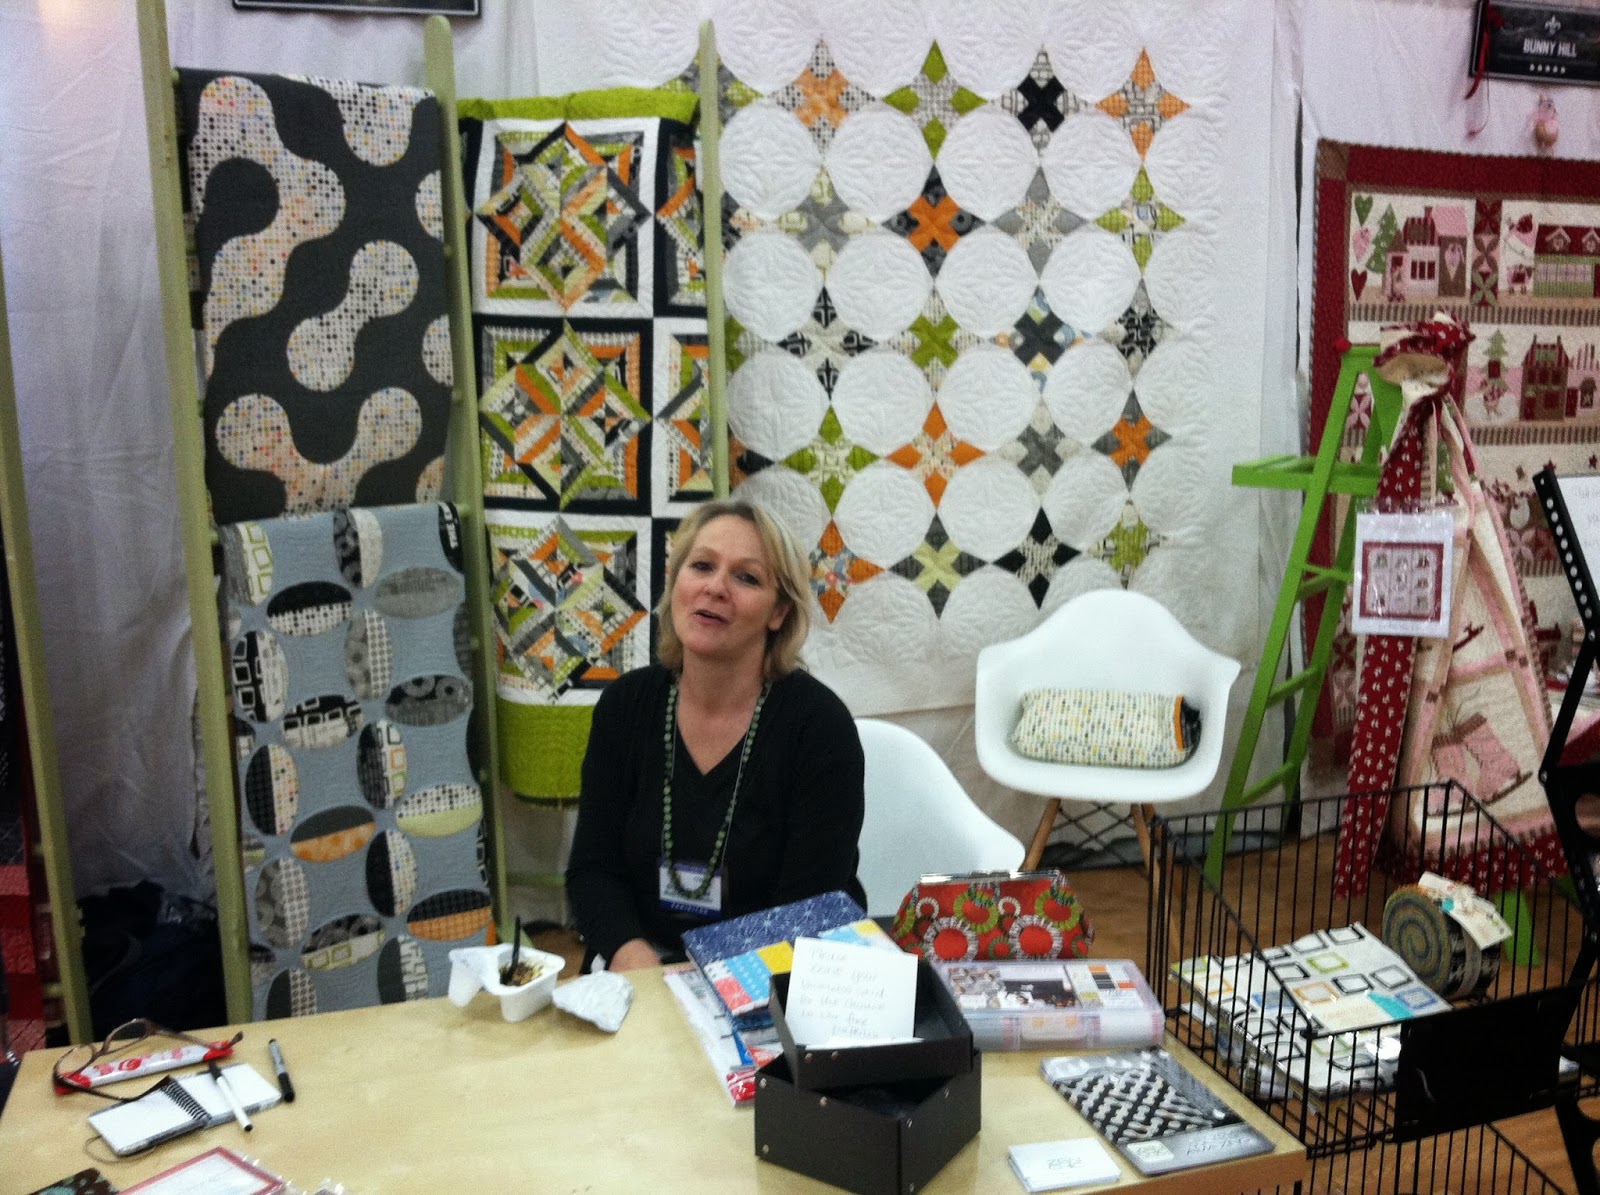
Every six months, I am pleased to travel to Quilt Market to help my friend Pati set up the booth for Marcus Fabrics. I was able to create a few things for the booth as well. This is the new Primo Plaid colors--beautiful soft blues, grays, tans, cream, and soft purple. Pati had the brilliant idea to purchase a few rolls of blackboard (wall cover), which was easy to install. It acts as a real blackboard--and we used a special marker that looks exactly like chalk.
The Primo Plaids are soft and wonderful--the most perfect thing for a quilt back for a baby, a pair of p.j.'s, jacket or the most yummy quilt!

Just in case you are looking for flannel with a little more intensity of color, Marcus Fabrics introduced the newest colors, designed by Sarah Maxwell (Sarah J Designs), called Color Crush! Same beautiful quality, in brighter, funky colors!

Marcus also has some wonderful wools, which I washed to 'felt' them. I made three pillows--the one you see above, which is a throwback to my youth. Ice skating was one of the activities I pursued from the time I was about seven or eight, and have done as recently as about three years ago. As you can imagine, Saint George, Utah doesn't have a lot of ice rinks. I have to wait until I see my sons in Wisconsin and Virginia. They both have rinks close by! Ha! At any rate, I will be making a pattern of this pillow, which should be available about November 30! More information to follow.
Second and third pillows use the bright wools from Marcus. Same amazing quality, and such fun to work with!

I used a machine stitch to stitch the four green squares in place, then stitched the black in the center. I used matching embroidery floss to stitch the buttons in place using different methods. No standard, boring buttons here.

Another machine-stitched appliqué pillow, with the wools. This would be great in a home with 'modern' decorating!
 |
| Lella Boutique with her Mama
I am not including all that I saw at Quilt Market, but here are a few more highlights: Vanessa and I are pictured in front of her wonderful display at the Moda Designer area of the sales area for her company. As you can see, she is showcasing her new line Sugar Pie! The center quilt is called Sugar Cookie, and the wonderful colors in the quilts are the sweetest treat ever!
A few feet away, I ran into another person I love--Jen Kingwell!
 |
Quilt Market is a place of inspiration to me. I am lucky to be a part of that wonderful world!
Wednesday, April 20, 2016
New Drapes for a Country French Bedroom
Floor-length drapes give such a wonderful look to a room and windows. For a while, I had some valances above the window, with some pleated window shades below. While it was a good temporary fix, this is what I wanted for the bedroom. The bedroom has a Country French feel, and the bed is dressed with a quilted coverlet--the dark red for the winter, and a light-color for the summer.

I began by measuring the distance between the lower edge of the bar to the floor, plus a couple of inches so they would puddle on the floor. I first cut a 10" x 53" strip from the plaid (for each drape) and an 83" x 53" strip for the length of the drapes plus a 3" hem. That included a 1/2" seam allowance. You will need to measure you own window area to adjust the lower part of the drapes. I spaced the ties above 5" apart, so I had to cut 9 pairs of 2 1/2" x 8" ties for each drape. (That was 36 in all, for both drapes). I also cut a 3 1/2" x 53" strip for a back facing. Either fabric will do for that.

I ironed the ties in half, length-wise, with wrong sides together. Next, I placed the raw edges inside the tie, touching the center, and closed it and pressed the edges inside. I stitched the ties, next to the folded edges, as a continuous strip of ties, and set them aside.
Next, I attached the top to the drape panel using a flat-felled seam. After the drape was assembled, I cut the lining (white, light-resistant) about 5" shorter than the drape panel. I pinned them wrong sides together, and trimmed any excess lining away so they were the exact width of the drapes. Pin along the edges, then turn under 1/4", then 1 1/4" for side hems. Stitch with matching thread.
At the top, baste the pairs of ties to the right side of the drape top, 5" apart. Adjust if necessary. Zig zag along one edge of the facing, and place the facing right sides together with the top edge of the drape, enclosing the ties. The sides will overlap on each side. Stitch together through all layers, and press the seams toward the facing. Flip the facing over the top, to the back side, press, and tuck the edges of the facing inside and hand-stitch in place.

As a final step, Tie the drape onto the rod, just with two of the ties (one at each end of the drape) just to see how deep of a hem you will need. remove the drape, press under 1/4" along the bottom edge, then along the hem. Hem stitch onto the back side of the drape (I use my Bernini, with Foot #5). Voila!
Monday, August 17, 2015
Poof! New Desk--From The Old Cherry-Wood Version
 |
| Detail of Desk Front
Sorry. I didn't take a 'before' picture--just got so excited about changing it, I forgot! You will just have to imagine a shiny cherry-wood finish, with cheap brass drawer pulls. Ugh.
The main reason I changed it was the daily need to dust the thing. Nothing like a dark wood to show every speck of dust. So..... I went to Home Depot and bought a beautiful light gray semi-gloss and a cheap dollar brush. Not a foam brush, mind you, but one of the ones with blonde bristles (which occasionally fall out and you have to pick them out of the paint). The reason I like them for this particular kind of finish is that the bristles are very fine, and the bottom edge is thinner (less bristles), so as I drag the loaded brush across the surface, it tends to bleed out and leave a few areas so you can see the old paint color underneath.
Prep work: Yes, I sand, even though the paint says it is primer and paint in one--and doesn't require sanding. I took my electric sander and roughed up the surface. The round legs, etc., were done with a hand sander, the kind that has a spongy center so it adapts to the shape of the legs. I cleaned off the dust, and painted it, streaking a little as I went along. The main thing is to check for drips, and even them out very gently, so they don't become a permanent part of your paint job.
I bought some new drawer pulls, and installed them. Voila!

I went to Jo-Ann's and found a remnant of this wonderful gray fabric, with a tweed look, and re-covered the cushion and screwed it back onto the chair. I love this new color--it lightens up the room!
The other major project was something I did a couple of years ago, but really haven't shown you:

These chairs were a dark stripe--navy, burgundy, cream--very masculine, but worn out. Let me tell you that I understand why upholstery shops charge what they do! The worst of it is removing the millions of staples. It's a HIDEOUS job! I save and label each piece (take photos, if you need to), so I could re-assemble once I cut out the fabric. I did go to a local shop to purchase some of the materials that were torn up in the process of taking it apart. I also removed the cushion covers, took them apart so I could use them for patterns. I re-used the zippers.
The funny part was that I had planned to make the living room gray and citron yellow. I even had made drapes. I walked into the fabric store in Las Vegas, looking for that nice little gray and cream print for the chairs--and then I saw this stuff! I don't know what came over me, but I left with this fabric, tore down the drapes and gave them away. Ha ha. It was just such happy colors, and I wanted the look! So there you are!
|
Sunday, May 24, 2015
Quilt Market in Minneapolis--A Quick Peek

The preparation for Quilt Market is always a bit of a stressful time, mixed with moments of "Aha!" and downright fun! This wonderful little pattern was created by a genius designer in England. If you want to know more about her, and download the pattern for yourself, go to this link: www.rainbowhare.com/2014/04/vintage-caravan-sewing-machine-cover.html. I made this one for the Marcus Fabrics booth at Quilt Market. It features their newest line of Aunt Grace vintage 1930's fabrics.
Jeannie made her pattern to fit her own sewing machine. I made this one a little longer, to fit my Bernina. The idea is so cute, though, I am making two more--one for a gift, and one for a sample to teach the class at the Fall Retreat at Dave's Bernina, St. George, Utah (and to cover my own machine when it is all finished).

This is the Christmas section of the Marcus booth. The little mini-quilt tree patterns will be featured in the July post on the Marcus Fabrics website. The little tree has cones I stitched together, and hung on the tree with a double-satin ribbon. I filled each cone with a red silk hydrangea.

Note the darling little rug at the base of the quilt. It is clothesline (not plastic-covered) wrapped with strips of fabric, stitched together on a sewing machine with a zigzag stitch (size 18 needle). Note the little fabric collage in the upper right side of the quilt--a genius girl named Sydney created this!

Check out the bright Amish quilt! Brilliant and beautiful! I created the little wool chicken quilt on the right--embellished Marcus bright wools with hand-dyed wool roving (with the Clover felting tool). Those of you who know me well know that I used to have a terrible fear of live chickens--based on an attack by a mama hen when I was 4 or 5 years old--and making fabric chickens seems to be part of my therapy. Ha ha. The beautiful jacket and skirt were made by Meredith, a friend from Dave's Bernina.

Marcus features fabrics copied from museum prints--their appeal to traditional quilters is very strong. The designers who created these beautiful quilts are talented women. You can see more of this sort of thing on the Marcus website!

I made this little wool pillow with some of the new brights--I machine embellished the edges of the wool shapes with my amazing Bernina machine. I always use Aurifil thread. This stuff is the best thread I have ever used--wonderful, clean, strong Italian thread. When they brag about their suits, shoes, etc., the Italians should definitely be proud of this product!!!!

Now, just look at this little vignette! These are just so appealing to me! Love the hexagonal quilt--and the fleur de lis 'birds' quilt spilling out of the antique frame! The 'bird' quilt was created by my cousin, Christine Echols--a quilt designer and long-arm quilter from St. George (Crab Apple Quilts).
The little dresses are from Violette Fields Threads. Love their designs!

Another fab quilt from Chistine Echols. Talented and modest Pati made the dresses. She could out-sew us all!

Now, I spent the first two days at the Marcus Booth helping Pati put the booth together, but I spent a great deal of time afterward walking the show and visiting Vanessa at her booth in the Moda Fabrics area. This Gooseberry line is Vanessa's second line, and her butterfly quilt is AMAZING!!!!! It turned out to be her number one pattern hit of Quilt Market (and that didn't surprise her proud Mama).

This booth had some wonderful modern quilts, in beautiful colors. I find myself drawn to these colorful places. Good displays always pique my interest!

Once again--the power of a good display. Love the little accessories, table, etc.

Check out the old Bernina in the corner!

Here is a display that I really loved! The colors of the flowers, the quilt--all of it just is wonderful! I saw the designer, and she looked like a teenager. I suppose that's a sign that I've been in this industry too long! Ha!
Thursday, April 2, 2015
The Scandinavian Quilt Project
 |
| Wool and flannel quilt project |
Sunday, October 26, 2014
Quilt Market, Houston, Texas--The Latest Adventure!

This is the George Brown Convention Center, in downtown Houston--the scene of every October's Quilt Market and Festival. The hotels, cab drivers and restaurants in the vicinity know this is their biggest time of the year, and they all know about the 'quilts'.... Little do they imagine what is inside the building--and after Quilt Market, the Festival is open to the public, and they come en masse! It's the ultimate pilgrimage for the avid quilter!
So, my day began on my arrival, on October 22--where we began by looking at a Bernina store near the airport. This store has changed their inventory from bolts of fabric to all pre-cuts--2-yard cuts, 1-yard cuts, 1/2-yard cuts, and fat quarters. When I asked the clerk how this new kind of fabric presentation was received, she said that the younger crowd loved it, but the older crowd didn't like it as much.

Most of the fabrics were either Moda or Benartex.

On Thursday, our day began early. This is how our booth looked as we were beginning the process of decorating--not so beautiful. Covering the tables was one of the first things, but we also hung special quilted curtains as a backdrop for the beautiful quilts which were arriving via Fed X and UPS. We un-boxed the quilts and little accessories and began making decisions as to where the main quilts would be hung.

So, one corner at a time, we put it together..... notice the covered pumpkins and little fabric pictures made by Sydney! I made the little dress with the striped skirt--Pati made the other three little dresses. And what a great quilt!

Here is a close-up of the covered pumpkins, sitting on a wonderful table runner--all Sydney's handiwork!

I made the little dress and the stuffed animals....and look at the wonderful quilt from the Aunt Grace line of 30's fabrics!

And a beautiful quilt made by my cousin, Christine Echols (her design and custom quilting) adds to the little vignette!

Here is another one of Sydney's fabric pictures--and our personal favorite!

Another one of Sydney's pictures with Christine's little quilt underneath the purple flowers--and it really added to the purple vignette! I happen to know that Christine's favorite color is purple!

I made the little dress--it's an Izzy and Ivy dress pattern! So cute!

I put this little vignette together.....with a collection of small quilts!

And this is my little display for the 'What's New' review.....

And this was one of my favorite displays in the 'review'..... I have always liked primitive folk art!
So here are a few things I saw that I thought were interesting:

I really loved this booth--it's the kind of place I could live in!!!

I like the modern quilt in the center--and the wonderful old bicycles! Now I know what I need to do with my old bike!

Fantastic jacket!

Love the colors!

...and the lettering is fabric wound around rope!

This was a display in Free Spirit's booth--notice the 'knock-off' of Vanessa and my pattern for the little tent.... Ha ha! Imitation is the sincerest form of flattery!

This is Jennifer Sampou (on the right), in front of her wonderful new quilting line of fabric--and her interesting quilts! I have always admired her work!

I liked the fabric baskets--I know they have been around forever, but I still like them!

...And of course, I still think Amy Butler is the best! I love her exotic and interesting fabric and patterns!

And a little bit of 'Tula Pink' with her collection of brights! She has a new Bernina sewing machine with her signature!

I liked this presentation very much--love the interesting wall hanging and the colorful pillows!

Here's Heather Bailey's wonderful booth! When I saw this in set-up mode, without the pillows and quilts, I noted the antique sofa with the wood painted with cream-color chalk paint and a medium grey upholstery! It was so striking with the warm tangerine walls--made me want to paint a room in my house just that color and find a sofa to upholster! Oh, so many things to do on my list of things to do!
Here, at last, is the Moda booth--and one of my favorite designers from Zen Chic! Her work is fantastic!

More Moda! This is Vanessa's friend, Deb.

Still more Moda--from the Bonnie and Camille line, this is Camille....

I just liked the clothing and the colors of the display....

This was one of the quilts in the huge display area of Quilt Market--quilts especially designed for exhibition. I wasn't allowed to photograph many of the quilts, but this one really caught my eye!
When I see things like this, I makes me want to run into my sewing machine and just stitch something fantastic together--It seems like far too many of the things I create have some sort of 'purpose'.... I have a place in my entry that needs something special. Perhaps one of these days....
Hope you enjoyed the 'trip' to Houston!
Subscribe to:
Posts (Atom)